Army of Liberty: a Fantasy Revolutionary Warfare Quest

I just realised, we could put infantry on the road, we just need to move them out of the way next turn, either charging going west
Put someone in the village tile to make sure LOS is blocked to the Lancers, I think. Just being in the woods isn't going to stop the royal arty from spotting them, since they're at a +6 for being elves on a hill.

No wait I'm reading the LOS line wrong, they should stay hidden by the 72nd and 200th.
 
Last edited:
Possible Western Enemy Actions, in order of likelihood.

1) They decide that this is not fair play, you should get a turn first. They stand in place, waiting for their moment or something, therefore allowing our units to say that they somehow managed to stall the enemy an entire turn while, like Luigi, doing nothing.
2) They're so s-s-scared of Halflings and artillery that they run off to the east to join the assault there, therefore leaving us bizarrely at loose ends in the west, but meaning they won't even be part of the battle until Round 3, which would honestly be amazing. No, not likely.
3) Hubris is a coward's word. They'll charge forward 6-8 spaces, accepting the gentle kiss of the Artillery as just nothing with the intent to slam into two enemy infantry units ready for them. Glorious, glorious charge of the Light Brigade!
4) Scared/worried, they try to slip around the edges of the map out of LOS of the artillery with the intent of doing a daring, bold attack to roll up the artillery and with it panic and destroy the enemy. Unfortunately for them, we have Hussars.
5) They move forward just outside of our artillery's medium range, which does keep them safe from it, but means that neither of them will be able to hit and run with any real effectiveness, and essentially is just a smarter version of #1. Not really a threat to us, but at least it's "sensibly cautious" so it goes higher on the list.
6) They take a middle of the road approach, moving close enough to accept, most likely, one Ready Fire by the artillery and trusting in their high Cohesion and the medium-range and all of that to see them through, while keeping far back enough that a surprise can't instantly paste them. This still leaves them vulnerable Round 2 to a well-placed Hussar charge, among other things, but seems like the most sensible thing? Since really, in this battle there's no avoiding that you'll be gently kissed by the artillery at some point if you're on either side.
 
Last edited:
docs.google.com

Turn 1 Orders Proposal

5th HA 84th A 19th PF 42nd 31st A 108th Hsr 28th PF 72nd 148th 45th 200th 16th 13th Lnc 55th Hsr Ready Fire N 700 Ready Fire NW 700 Ready Charge N 5

This is my current proposal for our plan.

Unfortunately the western hussars cant move without being at least seen so currently they are stationary.

The Ready charge of the eastern hussars is still open

What, they can't move 1E without being soon? The Hills wouldn't block them?
 
There is a gap between the hills which means that the eastern enemy forces can just see into the hex by a small margin

Okay, I'll need to, like. Can you please describe this to me? Because I'm not seeing how moving the Hussars 1 E would open up a gap. It'd still be behind the mountains blocking the LOS in the first place?

Other than that it looks good, but I'm really kinda confused on this point. As in, I'm literally looking at the thing, drawing the lines, and going, "???"


They cannot, it only gets revealed when they engage in combat.

Neat!
 
Actually, while this is definitely counting chickens before they hatch, what happens when we start getting battles with fifty or sixty thousand on each side, or into the hundreds of thousands, which doesn't happen often but is known and quite famous.
 
Okay, I'll need to, like. Can you please describe this to me? Because I'm not seeing how moving the Hussars 1 E would open up a gap. It'd still be behind the mountains blocking the LOS in the first place?

Other than that it looks good, but I'm really kinda confused on this point. As in, I'm literally looking at the thing, drawing the lines, and going, "???"

Wait, you are right there is no LOS, i completly forgot about the regiments that will bock LOS

The enemy may be able to spot it when their eastern cavalry moves forward and gets a better angle but the only way to avoid that is to move forward to hide on the edge of the map fully covered by hills
 
Last edited:
Actually, while this is definitely counting chickens before they hatch, what happens when we start getting battles with fifty or sixty thousand on each side, or into the hundreds of thousands, which doesn't happen often but is known and quite famous.

There is a limit to how many Units we can reasonably control on the map at once, alas. In such cases, Marshal Durand would no doubt delegate part of her armies to other generals and you'd only fight one (most critical) part of the greater battle.
 
There is a limit to how many Units we can reasonably control on the map at once, alas. In such cases, Marshal Durand would no doubt delegate part of her armies to other generals and you'd only fight one (most critical) part of the greater battle.

Makes sense. We do have a while before we get to that. The map honestly could be half-again as big and still be functional if need be, and while it definitely does take more work to command 14 units than 5 or 6, it's still pretty manageable because it's all part of an overall plan/vision.
 
Artillery now receives a -50 penalty to Firing on other Artillery. Other Units also have a -10 Firing penalty vs Artillery. The intent is to nerf the power of counter-battery fire while retaining a chance for skilled gunners to put the enemy crews out of commission.
Let's not miss this note, too. It means that we're going to need to use charges to dislodge them from the windmill, but the 5th might be able to pick off the other artillery if they're lucky.
 
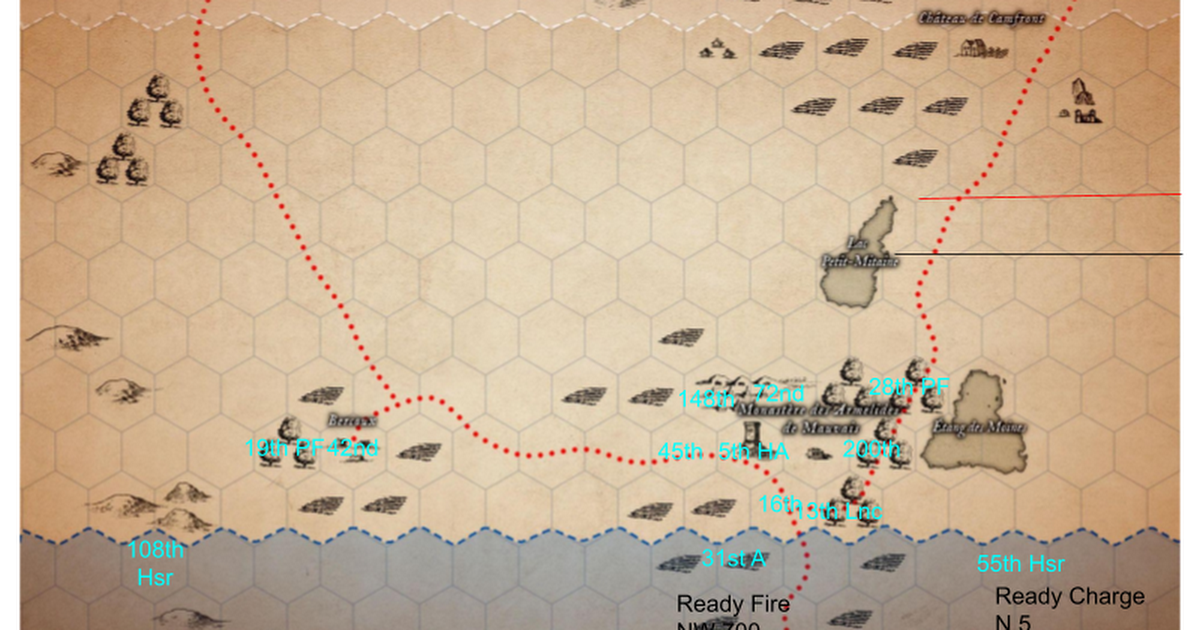
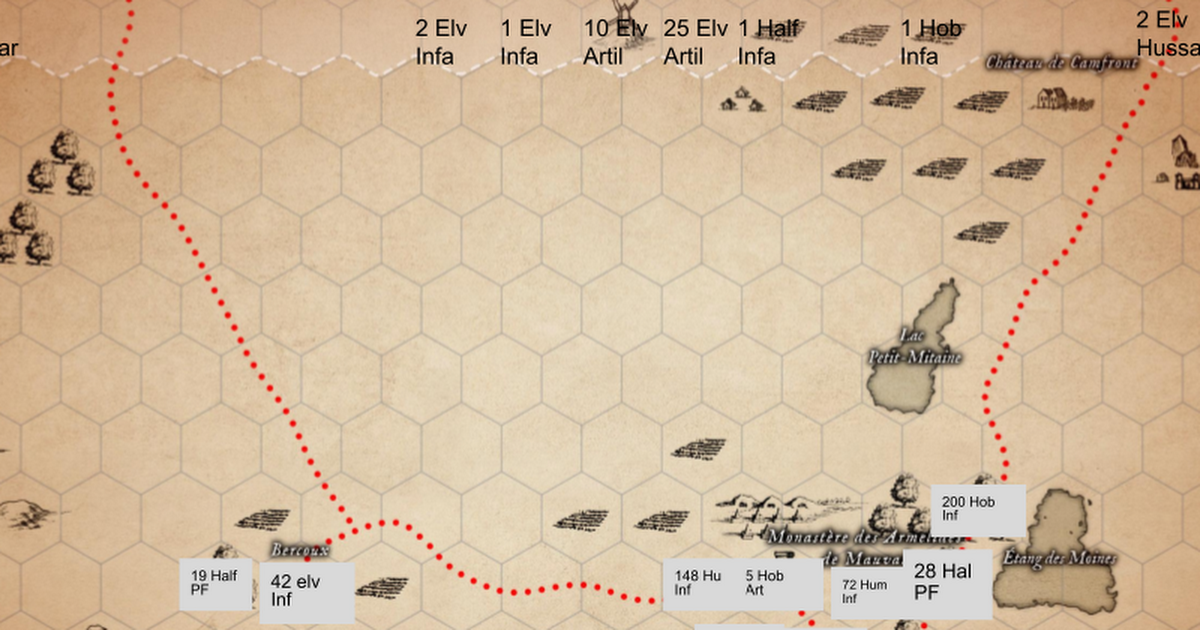
[]Plan: Fortify and Prime Countercharges
-[] 200th Hob: MOVE NE, NE, NE
-[] 72nd Hum: MOVE NE, NE, NE
-[] 148th Hum: MOVE NE, NE, NE
-[] 42nd Elv: MOVE NE, NE
-[] 45th Elv: MOVE NE, NE, NE
-[] 16th Half: MOVE NE, NW
-[] 19th Half Pfd: MOVE NE, NE
-[] 28th Half Pfd: MOVE NE, NW
-[] 55th Elv Hsr: READY CHARGE NE (500m)
-[] 108th Elv Hsr: READY CHARGE NE (500m)
-[] 13th Hob Lan: MOVE E, NE, NE
-[] 84th Elv Art: READY FIRE NW, NE (700m)
-[] 31st Elv Art: READY FIRE W, NW (700m)
-[] 5th Hob H. Art: MOVE NW, NE, NW, NW
-[] HQ: Attach Raka Durand to 5th Hob H. Art, MOVE NE

A defensive plan, designed to punish early rushes from their cavalry wings (while liming Ready Charge range to stay out of their artillery's medium range), and set up our Lancers to rush down the woods road next turn by leaving space for the infantry there to shift 1W (or charge). This is the orthodox plan with the downside of exposing our Infantry to their Artillery. However, while working this out, I thought of a Clever Plan that can mitigate that:

[X]Plan: No Fortify, All Countercharges
-[X] 200th Hob: MOVE NE, NE, NE
-[X] 72nd Hum: MOVE NE, E, NE
-[X] 148th Hum: MOVE NE, NE
-[X] 42nd Elv: MOVE NE, NE
-[X] 45th Elv: MOVE NE, NE
-[X] 16th Half: MOVE NE, NW
-[X] 19th Half Pfd: MOVE NE, NE
-[X] 28th Half Pfd: MOVE NE, NW
-[X] 55th Elv Hsr: READY CHARGE NE (500m)
-[X] 108th Elv Hsr: READY CHARGE NE (500m)
-[X] 13th Hob Lan: MOVE E, NE, NE
-[X] 84th Elv Art: READY FIRE NW, NE (700m)
-[X] 31st Elv Art: READY FIRE W, NW (700m)
-[X] 5th Hob H. Art: MOVE NW, NE, NW, NW
-[X] HQ: Attach Raka Durand to 5th Hob H. Art, MOVE NE

What this does is keep all our Infantry back a rank so that they stay out of their Field Artillery's Medium Range, and then next turn, we defend the 5th in the Monastery by readying countercharges, as opposed to bracing (unless they do something that doesn't put their cav in striking distance of the monastery, in which case we can move).

I'm fine with either of these plans but I'm putting my vote to the less predictable second one, since it means we'll take 0k this turn and might throw the enemy commander off his rhythm, while not technically leaving us any more exposed.

(EDIT: I made a change to both plans after posting to put the 28th Half Pfd. in the woods after all - it's a difference between ready firing at one tile or one of two tiles next turn and I'll take the ambush bonus over the options).
 
Last edited:
[X]Plan: No Fortify, All Countercharges
-[X] 200th Hob: MOVE NE, NE, NE
-[X] 72nd Hum: MOVE NE, E, NE
-[X] 148th Hum: MOVE NE, NE
-[X] 42nd Elv: MOVE NE, NE
-[X] 45th Elv: MOVE NE, NE
-[X] 16th Half: MOVE NW, NE
-[X] 19th Half Pfd: MOVE NE, NE
-[X] 28th Half Pfd: MOVE NE, NW
-[X] 55th Elv Hsr: READY CHARGE NE (300m)
-[X] 108th Elv Hsr: READY CHARGE NE (500m)
-[X] 13th Hob Lan: MOVE E, NE, NE
-[X] 84th Elv Art: READY FIRE NW, NE (700m)
-[X] 31st Elv Art: READY FIRE W, NW (700m)
-[X] 5th Hob H. Art: MOVE NW, NE, NW, NW
-[X] HQ: Attach Raka Durand to 5th Hob H. Art, MOVE NE

What this does is keep all our Infantry back a rank so that they stay out of their Field Artillery's Medium Range, and then next turn, we defend the 5th in the Monastery by readying countercharges, as opposed to bracing (unless they do something that doesn't put their cav in striking distance of the monastery, in which case we can move).

I'm fine with either of these plans but I'm putting my vote to the less predictable second one, since it means we'll take 0k this turn and might throw the enemy commander off his rhythm, while not technically leaving us any more exposed.

(EDIT: I made a change to both plans after posting to put the 28th Half Pfd. in the woods after all - it's a difference between ready firing at one tile or one of two tiles next turn and I'll take the ambush bonus over the options).

This does make sense mechanically - countercharging instead of bracing pretty much means that its bloodier for both sides, except that infantry can sustain the casualties better and the should be able to prevent the enemy charge against our artillery by getting in the way before the cavalry can reach. I am not sure if it should work to have infantry charge into the way of charging cavalry but i think this is the superior version of the plan.

Ill build it on a map to make it easier to visualise and give full feedback
 
I don't think you can attach the HQ to an active unit? I mean, if we could that would be very nifty because the monastery is a great HQ base. But I'm not sure if it's mechanically possible.
 
I don't think you can attach the HQ to an active unit? I mean, if we could that would be very nifty because the monastery is a great HQ base. But I'm not sure if it's mechanically possible.
Raka/the general can also attach to a different Unit if wished, but this brings its own risks if that Unit gets attacked.
I'm not attaching the HQ, I'm attaching Raka. Mostly this is to avoid the worst possible outcome of their Hussars sneaking around and attacking our Base Panel here.

Eventually I want the HQ on either the crossroads or the farm 1W of them so it can resupply both artillery, Raka can move back then.

(Really should have put the HQ 1W of the Lancers to start but that was me being lazy on repeat edits so c'est la guerre.)
 
Last edited:
-[X] 16th Half: MOVE NW, NE

This is moving the unit through our artillery so its invalid. But we should be able to do NW, NE i think, though the horse artillery needs to go west around the 13th i think because of it.

-[X] 13th Hob Lan: MOVE E, NE, NE

This goes through our artillery too but its cavary it can just go around

-[X] 55th Elv Hsr: READY CHARGE NE (300m)

This means that they will only charge against the enemy if they fully move down, i would be a lot more comfortable with 400m or 500m range.

If we ready charge at 500m and catch them they will still be in range for a 200th and 28th charge in addition to the lancers
1. Edited to reverse move order

2. No it doesn't (EDIT: unless you mean the first time it moves into is the first tile the 5th moves into but I don't think we're worrying about that?) (but also correct we're using less than half their move)

3. Honestly you're right here, I'm gonna very quickly edit and hope that doesn't change anyone's mind, rather than make a new plan.
 
Last edited:
docs.google.com

No Fortify, All Countercharges

S Dwa Infa S Dwa Infa 2 Elv Hussar 1 Elv Hussar 1 Elv Lancer 2 Elv Lancer 1 Half Infa 2 Elv Infa 1 Hob Infa 1 Elv Infa 25 Elv Artil 10 Elv Artil HQ 108 Elv Huss 5 Hob Art 28 Hal PF 84 Elv Art 45 Elv Inf 13 Elv Art 148 Hu Inf 13 Hob Lancer 200 Hob Inf 42 elv Inf 55 Elv Hus 19 Half PF 72 Hum Inf 16...

visualisation of the plan


[X]Plan: No Fortify, All Countercharges

Though, wont the 200th get any ready fires from the enemy artillery?
Only one of them, assuming they specify 700m. Given that they're in the woods I think they'll be fine. "0k" is I guess inaccurate, though.
 
Do we think that the western artillery will enter into the range of the 31st? I dont think its likely and we could fire at long range against the western hussars instead. A guaranteed 1d100-50 compared to a possible 1d100-20. We will also learn what the trait of the 31st is which may be relevant
 
Do we think that the western artillery will enter into the range of the 31st? I dont think its likely and we could fire at long range against the western hussars instead. A guaranteed 1d100-50 compared to a possible 1d100-20. We will also learn what the trait of the 31st is which may be relevant
I'm really not super interested in an attack with a 50% miss chance - cannonballs aren't free, and all. If you want to propose a minor edit to the plan with that, though, I ain't gonna argue too hard against it.
 
Back
Top