Instructions Unclear: Created an Art Help Thread

HEY, YOU. You tired of "real" artists mocking your workflow and how you can't put your ideas down on paper? Don't you want to have the confidence to draw what you want?

...Sadly, learning to draw isn't something you can pick up like some mail order Charles Atlas doohickey. There's no magical workaround to greatness. You'll spend years slaving away at it until you can finally have something presentable. The old saws about hard work and dedication apply here more than almost anywhere else. In my experience there is no substitute for doing your work.

But art is art. It's not a science, and you don't magically gain skills just by coloring by the numbers. What works for me might not work for you, and what works for you might not work for me. This thread isn't me or anyone else stating "You MUST do it this way." It's just what's worked for us in the past. At the end of the day, it's up to you how you use what you've learned. Some folks like looser and more abstract illustration, while others like tight technical design work. So of course it depends on what you like and what you want to do with it.

Which brings us to the reason for all this artsy mumbo jumbo. You're here because you want to learn how to draw good. And you've probably read all sorts of helpful books about art and how it's made. Might've even taken a class or two. But you keep bumping into roadblocks on your path to success. People keep saying you need to learn this stupid "construction" thing. Why can't your shapes show form and volume? What's all this bullshit about composition and values? You've got all these resources and yet none of them are helping you! WHY?!

Well, you're here. That's a pretty good first step.

Let's get started.
 
Lesson 0

The first thing every budding artist needs to learn is critique. What it is, how to accept it and how to provide it to others.

Art tends to be an intensely personal activity. You put time and effort into creating something based on your own experiences and imagination, often something important to you—and then some jerk comes along and tells you that the nose doesn't belong in the middle of the forehead and spines don't bend that way. Who do they think they are?!

The thing is, while art is inherently subjective, many of its metrics are not. If you want to draw a dog, for example, you're going to have to limit yourself to four legs and two eyes. The art police won't cart you away if you can draw your fuzzy friend with eight legs, four eyes and two body segments, but that doesn't mean it's correct. "But it's my style!" you cry defiantly. No, it's a spider.

"Lesson zero" is learning to emotionally distance yourself from your work in order to accept critique. Sure, you may eventually reach astounding levels of artistic greatness without outside help. But let's be honest, learning to do things on your own really sucks. It's slow and often miserable, and you spend a lot of time repeating the same mistakes.

That is where critique comes in. Critique is not trolling or hate. It is constructive criticism based on thoughtful analysis. It should be given with the intent to highlight problems in the work and, if possible, provide suggestions so that the artist can correct them and improve. Likewise, critique should be accepted with consideration. You are not obligated to act on critique, but you should at least take some time to understand what is being said and decide if it is applicable. Let's look at some examples, shall we?

Good critique:
"Double-check the proportions of the face. The eyes seem too far apart."
"It looks like you have a solid grasp of drawing spiders. You should try broadening your skills by drawing other animals, like dogs."
"The composition is good, but your contrast is really low. Increasing the contrast should make things clearer."​

Not critique:
"lol ur faces r terrible"
"I don't like spiders. Draw a different kind of thing because I said so."
"You art is bad and you should feel bad."​

Good response:
"I'm not going to do any more work on this drawing, but I'll keep that in mind for the next one."
"Okay, I'll think about doing that."
"I thought it was missing something. Thanks for the suggestion!"​

Poor response:
"omg why are you being so mean to meeeee??"
"STFU, I'll draw spiders if I want to!"
"Go jump in a lake!"​
 
On Supplies

But before we begin with what you're probably looking for, a brief interlude to talk about what the poor craftsman blames: the tools.

Generally speaking, you can get away with just about anything when it comes to art, but since this is about practical drawing, you're not getting too far away from the basics:


(Cachet sketchbooks, in this case from Blick's)


(Picture courtesy of penciltalk.org)

Now, you can scrawl all you want on whatever's available to you (Lord knows I do enough of that), but when it comes to learning, nothing beats a sketchbook and a pencil. Now, you're probably wondering "Hey, Falchion you pretentious fuck, why don't you just use a ream of printer paper instead of the fancy spiral-bound sketchbook? It's cheaper and you get more for your money!" And to that, I say that going with printer paper is entirely up to you. You want to use it because you can get more of it for less, or for whatever other reasons, go right on ahead. However, I've found that a sketchbook allows you to keep all of your work and progress in one place. Or if you're a negative sort of guy like me, it's a place where you can view all of your failings in one convenient place. In my experience, loose sheets are useful for scanning but tend to go all over the goddamn place when you're trying to archive them. Not to mention that they rub and smudge worse than even the cheapest sketchbooks.

So let's talk about your sketchbook, if you choose to use one. If you don't, you can probably just skip this section. For learning, nothing beats a good-sized sketchbook. Something close to 8.5x11 will do the trick. You want something large enough to move around on, but not so large that you can't fit it in a backpack or conveniently carry tucked under your arm. Ideally, it'd be acid-free, and in the interests of archiving and price, skip being environmentally conscious and go with the non-recycled papers. The additional chemicals they throw into it makes the stuff deteriorate faster. In any case, you probably want something with a little bit of tooth. I have a personal preference for my papers to have a slick plate finish, but it's not for everyone. The paper's ideally mid-weight, not too heavy but you should be able to give it a good erasing without having the whole page crumple on you. Something in the 70-90 lb range would work fine. As for binding, that's another thing that's entirely up to what you're looking to do. A stitched sketchbook is more durable, but it's not ideal for travel and bringing out into the field for drawing whatever happens to catch your eye. On the other hand, a ring-bound sketchbook is generally going to be looser-bound, which means the pages are going to rub together in transit and anything you have on facing pages is probably going to end up a smudged mess if you're not careful.

Pencils now. Well, pencils and pens basically work alike when you're learning, but I've always had a soft spot for pencil work. Softer, more expressive, and capable of subtleties that pens generally need to be worked carefully to achieve. And of course you can erase your screw-ups. Mechanical pencils are perfectly fine, although going with wood-case pencils gives you cheaper access to varying hardnesses. Some folks like their cores soft in the 2B-4B range, others like to keep it neutral in the 2H-F range. Personal preference? General Pencil's Kimberly in 6H. Harder wearing than your usual softer drawing pencils, but it's just as capable of laying down a readable line. Again, this is just my personal preference. Generally speaking though, you probably will prefer and use the stuff they sell in those "sketching tins." And there's no beating a half-blunted #2 pencil for when you've got an idea that needs putting down immediately.

But now for a momentary interlude from the digital realm. I can hear the cries of outrage and hatred now. "What about my tablet, Falchion?" "Why can't I learn with this super-expensive electronic hardware I got?" "Go fuck yourself with a cactus, Falchion, I'm going to use my computer to learn!" And of course, if that's the pool you want to drink from, I'm not pulling you away. But remember that working digitally relies upon a grasp of the fundamentals most people first learn putting pencil to paper. In all my years of doing digital work, I still usually first have a pencil sketch or thumbnail that I scan in to start working it digitally. Barring some sort of quantum super computer becoming the norm, there's no comparing working digitally with the immediacy and kinesthetic feedback of drawing with traditional media. Plus, you don't need to break the piggy bank to fund your habit.
 
Cheapskate Note: Go to your normal printing shops, and ask how much to bind a ream of printing papers into a book. Compare to sketchbooks at your art shops.

Considerations: Printing papers are not that good for drawing, but they are cheap.

Pencils: HB - 2B, at least these when you start sketching for real. The more H, the thinner the line, allowing you to make more helplines as needed. The more B, the thicker the line, giving depth, shade, as well as clear differences between foreground and background objects when you use thicker lines for closer ones.

Eraser: No clue here. :(
 
Hey, am I the only person who has a hatred of drawing feet, and instead opts to never showing them and hope people don't care? Or is that fairly common? Note that I consider myself to be, while not bad at drawing, still having issues with anatomy, as well as the fact that I'm lazy.
 
Last edited:
Hands and feet are indeed among the most hated aspects of human anatomy for many people

Why do they both have so many bones? What do I do about all those toes? Why are they called fingers if they don't fing?

But hiding them is not the answer. At best, trying to hide things you need improvement on will make your compositions awkward and ungainly; at worst, it will cripple your development as an artist. Nobody is born being great at stuff like this. You will never, ever get better if you don't buckle down and try. Just remember, "Sucking at something is the first step to being sorta good at something." And there's no shame in being kinda lousy at something if you're at least trying to improve.

Don't be afraid to fail--or even to do not-quite-as-good as you had hoped. Destroy your fears with knowledge! Destroy laziness with practice! Those are the two most essential tools for any artist. You solve problems in your work with study, and you strengthen your skills by applying what you've learnt.

I would eventually like to cover some human anatomy in this thread, but that's probably going to be quite some time away. We're starting with the very basics, right now. In the mean time, I'd suggest three things to help you improve: check out some anatomy books (such as these: http://amzn.com/0195030958 & http://amzn.com/0857680986), draw from life (rope friends or family into sitting for you), and lastly, practice!
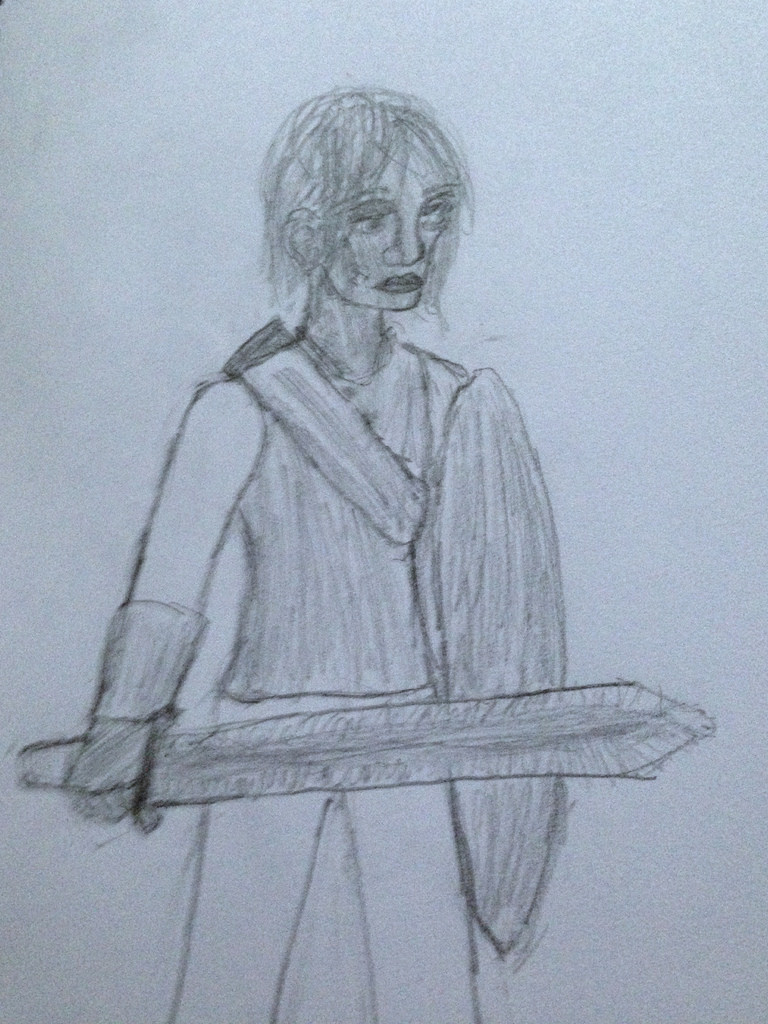
Well, here's a sample of my art:

Notice how I cut off at the feet. In general, I think the face looks fairly good and the hand is, at the very least, not completely sucky. The sword also isn't too terrible.
However, what do you think?
 
My 100% honest opinion? You're lacking in fundamentals. But that's okay!

I think what would benefit you most, right now, is to hone your skills in line quality and volume. The lines are very choppy and the form looks flat--both of which are common problems and both of which are fixable. We'll cover those topics soon in this thread, and I would definitely suggest brushing up on them in your own time, as well.

I know that's not related to feet, or human anatomy, but those are two areas that will support those pursuits. Fundamentals might sound boring, (and I was as guilty as anyone of trying to sneak past them in favor of more "fun" things, when I was younger), but they are called fundamentals for a reason.

Humans are one of the toughest things to draw and even tougher to draw well. Much of that is due to the fact that we are humans: our brains are programmed to recognize when something's "off." Learning all the ins and outs of drawing people is very, very challenging--which is not to say it's not very rewarding, as well. But you will have a much easier time tackling all of that, once you have a solid understanding of more basic skills. But don't take that as me telling you not to draw people. Just keep in mind that there are other skills which will facilitate your improvement in drawing people.
 
In eye-searing yellow!

It took me a long time to get the proportions to this stage and there's still something off about it. Especially the legs.

 
So, I finally got fed up with my inability to put a line quite where and how I want it, and am filling pages of printer paper with zillions of lines and circles and leaving them lying around like a crazy person. Is this good practice or have I just gone mad?

In eye-searing yellow!

It took me a long time to get the proportions to this stage and there's still something off about it. Especially the legs.

I think your basic problem is that everything from the waist down is scaled for a smaller person than from the waist up.

It's good that you aren't shying away from nonstandard poses and foreshortening.
 
I have a few generalistic things to say, mainly about drawing characters:

1) about the order in which you draw.
While it may not be instinctive at first, you should start your drawings from the outside to the inside, and not the inverse.

An exemple of what not to do and why:
You start doing let's say an eye. It's awesome. It's like the eye to end all eyes and it took you approximatively three months to do. Because it's awesome. You then start to draw the rest of your character and, oh snap, it doesn't fit the page. You have now two options: try to fit everything anyway, which will make for an awkward pose, or erase what you did, which will be horrible and make you lose a lot of time.
That's bad.
If you had started from the outside, in that case the general shape of your character, you could have added the eyes and other details when you were sure they would be in the right place, thus saving time and tears.
It also works for environments; you don't start by drawing the leaves, you start by the rough shape of the forest and where it will be.

2) reptile brain is a thing.
It's more like a bit of trivia, but oh, well. In a character, people tend to look first at the hands and eyes, which can display a lot of intention (old instinct; if he's looking at you like you're a steak and he's got claws, it's bad), so be sure to do it well. It's about the second most important thing after the general pose.

3) about where to start constructing your characters.
So... if it's only a character on nothing, you can ignore it, but if you want to place it in an environment, it's really important. You must start a character by the thing in contact with the ground, or rather the thing that holds him. If he's standing on the ground, it's the feet. If he's hanging on a rope, it's the hand (or the neck if he was hanged). If he's kneeling, it's... well, the knees or a part of the feet or a part of the leg, I guess, you decide what works well. That way, you can more reliably convey the wight of the character.

4) generalist posing things.
A good pose is usually in S (the legs go /, the torso goes \ and the head goes /, for exemple).
Shoulder and hips are never paralel. Make them go < or >
Changing the axe between the body and the head is nice if optionnal (body in 3/4, head front or profile for exemple)
The support leg is centered. Try to balance a disk on a pencil if you want to understand why.


And that's all I thought of for now. Do you want me to make a series of sketches to explain useful ways of constructing characters?
 
I've got a thing. With an influx of work, I've been less able to fully compose lessons and tutorials to post here (But they will be happening, rest assured), but if you've got a question and I'm streaming, you're welcome to ask it there for a live lesson of sorts.
 
Okay this thread is a rotting corpse but I thought I could give some tips for getting the proportions of people correct:

- The eyes should be around the middle of the head, and align with the top of the ears. Basic stuff.

- From the front, the visible part of the neck is about 1/3 to 1/4 of the head. From the back, about 1/2. Where the back of the neck ends, the earlobes begin. This is also roughly around the level where the nostrils should be.

- Three heads = length from shoulder to shoulder. This does mean a hypothetical three headed person won't have any free space on their shoulders.

- Your wrists should be somewhere around your waist/groin. The length of your hand is about equal to your pelvis.

- Your fingers are approximately as long as your palm. The second knuckle on the thumb lines up with the base knuckles of your fingers.

- Remember, your foot goes from your wrist to your elbow.

- Most people are around 7 heads tall. More if they're tall, less if they're short.

- You have a perfectly good subject for studying the proportions of the human body. Just stand in front of a mirror.
 
Last edited:
Okay this thread is a rotting corpse but I thought I could give some tips for getting the proportions of people correct:

- The eyes should be around the middle of the head, and align with the top of the ears. Basic stuff.

- From the front, the visible part of the neck is about 1/3 to 1/4 of the head. From the back, about 1/2. Where the back of the neck ends, the earlobes begin. This is also roughly around the level where the nostrils should be.

- Three heads = length from shoulder to shoulder. This does mean a hypothetical three headed person won't have any free space on their shoulders.

- Your wrists should be somewhere around your waist/groin. The length of your hand is about equal to your pelvis.

- Your fingers are approximately as long as your palm. The second knuckle on the thumb lines up with the base knuckles of your fingers.

- Remember, your foot goes from your wrist to your elbow.

- A tall person should be 7 heads tall. Short people are about 5 heads. Most people should be 6 heads tall.

- You have a perfectly good subject for studying the proportions of the human body. Just stand in front of a mirror.
-Elbows match up with the dip in your waist.

Also, for details and posing, desktop cameras are great, even the super low quality ones. My PhotoBooth is 80% pictures of my hands and 10% poses, lighting refs, feet, and ears. (the remaining 10% is pictures of my cat, of course)
 
Out of curiosity, what do people here think of the usefulness of anthropometry studies for drawing people? I find they're really quite helpful for improving one's grasp of the proportions of the human body.
 
Last edited:
Out of curiosity, what do people here think of the usefulness of anthropometry studies for drawing people? I find they're really quite helpful for improving one's grasp of the proportions of the human body.
I mostly draw in anime style, so the use is limited, but I still find it valuable to dig up old NIH statistics on occasion.

So, I finally got fed up with my inability to put a line quite where and how I want it, and am filling pages of printer paper with zillions of lines and circles and leaving them lying around like a crazy person. Is this good practice or have I just gone mad?
Way way way late, but -- did this actually work? Because I'm thinking about going down the same route - maybe backing it with some automatic grading, just "did you draw your line straight? Is your curve the curve you meant it to be?" and so on.
 
Way way way late, but -- did this actually work? Because I'm thinking about going down the same route - maybe backing it with some automatic grading, just "did you draw your line straight? Is your curve the curve you meant it to be?" and so on.
I'm better at drawing lines now, but it was a huge pain in the ass for a small amount of improvement.

I'm the guy in the infomercial going "There's got to be a better way!"

(The infomercial is for LazyNezumi)
 
What's the best way to practice when starting out? I've been told to start ignoring tutorials/books/etc until I start drawing, well, a lot more. (Hey, at least it's a hobby where I can have something in the background)
 
What's the best way to practice when starting out? I've been told to start ignoring tutorials/books/etc until I start drawing, well, a lot more. (Hey, at least it's a hobby where I can have something in the background)
You've kind of been told wrong? Books and tutorials are a great help.

Sketching from photos or real life is a great idea too. It's recommend leaving stylisation for later however.
 
Let's give this joke in the OP an entirely new meaning:V

I have been having a blast messing around with all this new AI-Art stuff by typing in random-ish strings of words to create eldritch abominations. One particular thing that I have grown fond of is when in more stylized outputs the AI 'messes up' and some stretch of colour turns from, for example, a leg into a puddle without an actual distinct point where a change happens.
I have previously seen Artists deliberately use this, but since I am totally ignorant in this field I can only suspect that it actually has a name. Can anyone help here?
Since prompts kinda work like shitty Demonology I will be able to deliberately induce it as soon as I know the name of this stuff^^
 
If I may add a few free resources for this thread:

Ctrl+Paint is a website focused on developing digital art skills. While it has attached for-cost courses, it (as of this post) also has a library of free videos covering much of what a beginner might want or need to know. (Not incidentally, that link starting this paragraph points straight at that library.)

Drawabox is a similar site, with a different methodology to learning art. It has a more interactive community, but some of the critique involved requires payment; however, a number of its lessons are free, including the early ones. One tenet of the site is 'no erasure', as they expect the user to use ink for drawing.

Monika Zagroblena has a blog with a lot of useful, free art tips. There's one in particular I would point out for a hard skill of key value: That is her sketchbook original for "How to Draw from Imagination", which focuses on precision, i.e. tool control, and putting that line where it needs to go.
 
Back
Top